ExpressGST || E-Way Bill Generation, Cancellation, Update, and Rejection Process
E-Way Bill (EWB) Module
This release introduces the E-Way Bill (EWB) Module, enabling users to generate, manage, and track E-Way Bills directly within the application. The module provides end-to-end life-cycle management of E-Way Bills within Express GST, ensuring improved operational efficiency, regulatory compliance, and transparency.
Key Features
- E-Way Bill Generation: Generate E-Way Bills with Part A or Part A + Part B details, supporting both single and bulk generation of records.
- Update E-Way Bill (Part B): Update vehicle number and transporter details whenever required to ensure accurate transportation information.
- Cancel E-Way Bill: Cancel generated E-Way Bills within 24 hours, in accordance with applicable GST regulations.
- Reject E-Way Bill: Reject E-Way Bills that have been incorrectly assigned by other taxpayers.
- View/Download & Email: View or download generated E-Way Bills individually or in bulk, and email copies directly to concerned parties or to the user’s registered email address.
- Download Edit Logs: Maintain a complete import/export history of E-Way Bill transactions with timestamps, along with edit logs to track all modifications performed within the system.
This enhancement strengthens compliance management by providing a centralized, efficient, and transparent framework for handling E-Way Bills within Express GST.
1. E-Way Bill Generation
The application enables users to generate E-Way Bills directly within the system through either Excel-based bulk import or manual entry.
The E-Way Bill (EWB) Module facilitates the creation, management, modification, and tracking of E-Way Bills for the movement of goods in accordance with GST regulations. The module is structured to support different stages of the E-Way Bill life-cycle, ensuring efficient processing, monitoring, and compliance.
Accessing the E-Way Bill Generation Screen
Follow the steps below to access the E-Way Bill Generation functionality:
- Navigate to the E-Way Bill Module.
- Click the Generate option to open the Create / Edit E-Way Bill screen.
Create / Generate / Edit E-Way Bills
Users can generate E-Way Bills from the EWB Generation screen using one of the following methods:
- Excel Import – Recommended for bulk creation of E-Way Bills
- Manual Entry – Recommended for individual E-Way Bill generation
Method 1: Generate E-Way Bills Using Excel Import
This method allows users to generate multiple E-Way Bills simultaneously by uploading data through a predefined Excel template. It is particularly useful for organizations handling large volumes of transactions.
Procedure
- Navigate to EWB Generation.
- Click the Import Book Data option available on the left panel.
- Click Blank Template to download the predefined Excel template.
- Open the downloaded template and enter the required E-Way Bill details, including:
- Supplier GSTIN
- Document Number
- Document Date
- Party GSTIN
- Party State
- Item Details
- Taxable Value
- Transport Details
- Save the completed Excel file.
- Upload the file using the Import option.
- Select the preferred import method:
- Append – Adds the uploaded records to the existing data.
- Overwrite – Replaces existing records with the uploaded data.
- Click Import to upload the records into the system.
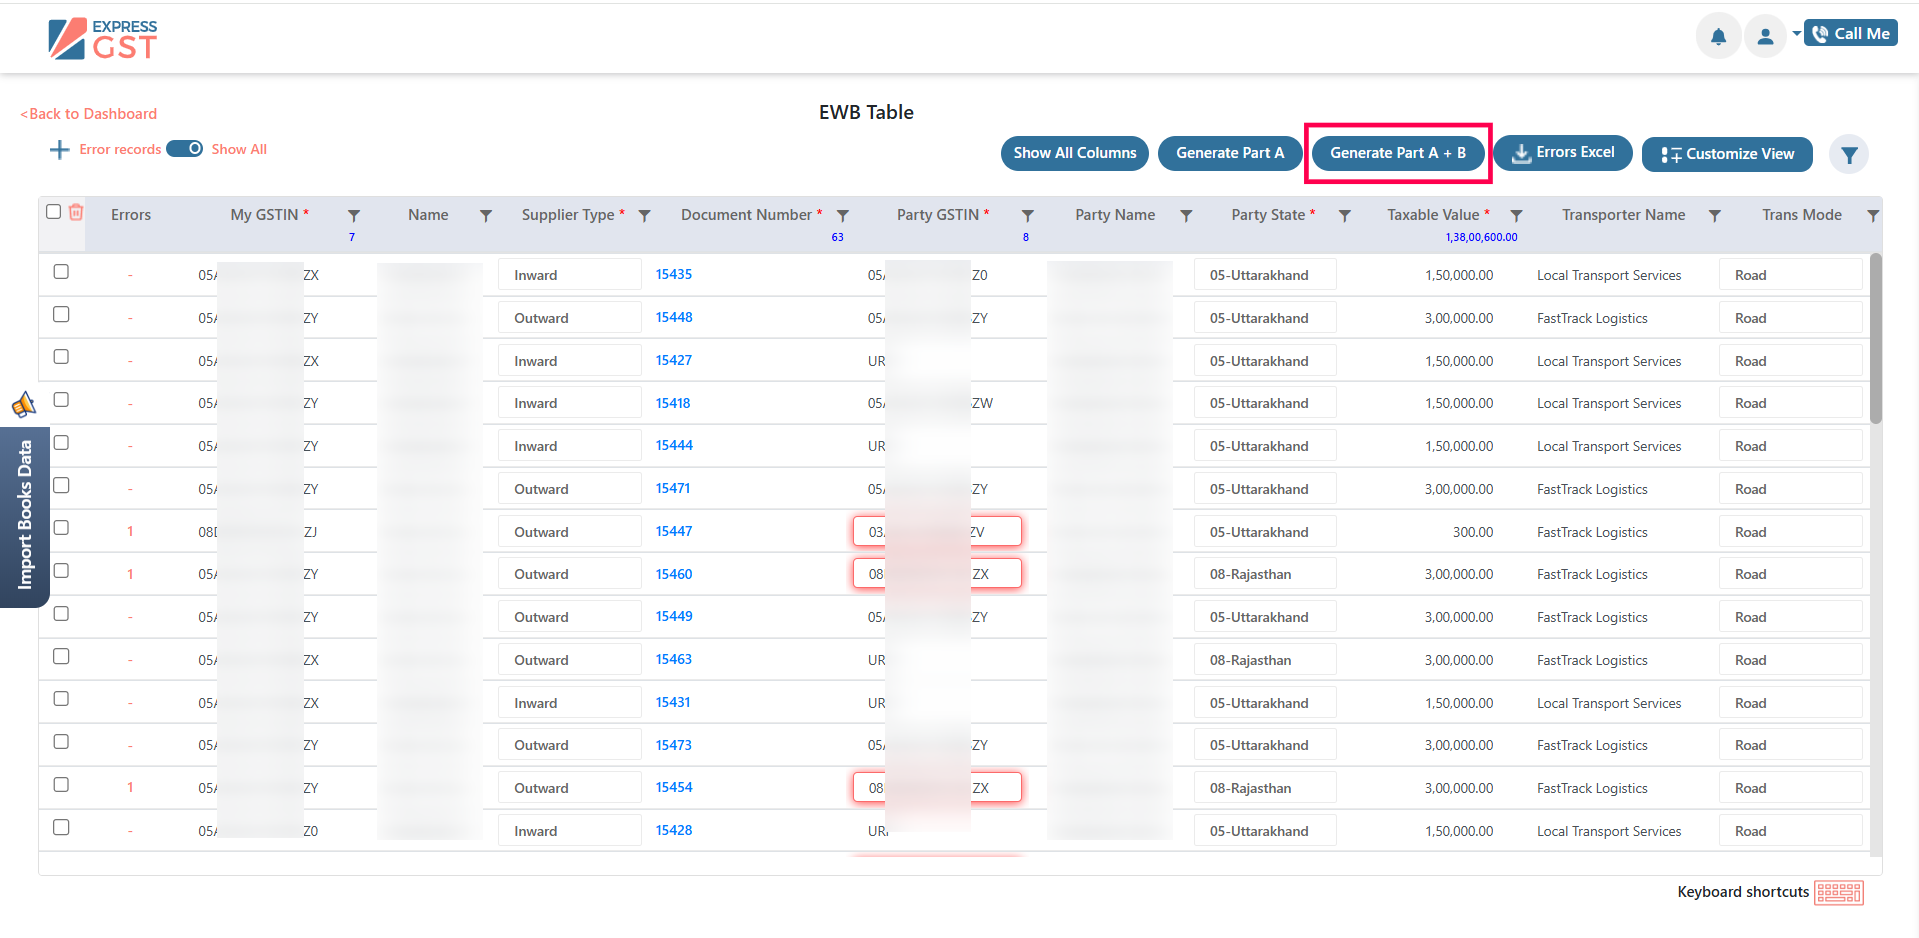
- The uploaded records will be displayed in the EWB Table.
- Review the records and correct any validation errors, if identified.
- Select the required records and click Generate Part A or Generate Part A + Part B.
Advantages
- Enables rapid generation of multiple E-Way Bills
- Minimizes manual data entry
- Suitable for high-volume operational environments
Method 2: Generate E-Way Bills Manually
This method allows users to enter E-Way Bill details directly within the system and is typically used when generating individual records.
Procedure
- Navigate to EWB Generation.
- Click the Add (+) button.
- Enter the required information, including:
- Supplier Details
- Recipient (Party) Details
- Document Number and Date
- Item Details and Taxable Value
- Transporter Details
- Vehicle Number
- Click Save to store the record.
- The saved record will appear in the EWB Table.
- Select the record and click Generate Part A or Generate Part A + Part B.
E-Way Bill Generation Options
The following operational options are available within the EWB Generation section:
- Show All Columns: Displays all available fields in the EWB table.
This feature is useful when certain columns are hidden due to customized grid view settings.
Generate Part A
This option generates Part A of the E-Way Bill.
Important: Ensure that the GSP credentials are properly configured in the system before initiating the generation process.
Part A Includes
- Supplier Details
- Recipient Details
- Document Number
- Invoice Value
- HSN Details
- Taxable Value
Generate Part A + Part B
This option generates the complete E-Way Bill, including both transaction details and transportation details.
Part B Includes
- Transporter Name
- Mode of Transport
- Vehicle Number
- Transport Distance
Selecting this option results in the final generation of the E-Way Bill Number (EWB No.).
Upon successful submission and validation of the records, the system generates a unique E-Way Bill Number (EWB Number).
The generated E-Way Bill can then be viewed, downloaded, or managed within the E-Way Bill module.
The generated E-Way Bill can then be viewed, downloaded, or managed within the E-Way Bill module.
2. Cancel Generated E-Way Bill
This feature allows users to cancel a previously generated E-Way Bill (EWB) in situations where the goods are not transported or incorrect details were entered during the generation process.
 Note: As per GST regulations, an E-Way Bill can be cancelled only within 24 hours of its generation.
When to Use
This option can be used in the following scenarios:
- Incorrect invoice details were entered during E-Way Bill generation
- A duplicate E-Way Bill was generated for the same transaction
- The goods were not transported as planned
 Navigation: E-Way Bill Module → Cancel E-Way Bill
Steps to Cancel an E-Way Bill
- Navigate to Cancel E-Way Bill from the E-Way Bill module.
- Select the applicable My GSTIN.
- Enter the E-Way Bill Number (EWB Number) that needs to be cancelled.
- Select the appropriate Reason for Cancellation from the dropdown list.
- Enter Remarks to specify the reason for cancellation.
- Click Submit to complete the cancellation process.
3. Update Part B Only
If Part A of the E-Way Bill has already been generated, the Part B details must be updated within 15 days.
Steps
- Ensure that Part A has already been generated.
- Navigate to the Part B Update section within the system.
- Select the preferred method for updating invoice details:
- Single Invoice – Update details for a single invoice.
- Bulk Invoice – Update multiple invoices simultaneously.
- For bulk updates, import the invoice details using the Excel Import option.
- Upload the Excel file containing the required invoice details.
- Verify the uploaded data and proceed to Update Part B.
4. Reject E-Way Bill
The Reject E-Way Bill feature allows a recipient to reject an E-Way Bill generated by another taxpayer using their GSTIN, in cases where the transaction is incorrect or not applicable.
Important: E-Way Bills generated by another party can be rejected within 72 hours of generation. Once rejected, the E-Way Bill becomes invalid.Steps
- Navigate to the Reject E-Way Bill section.
- Enter the GSTIN and E-Way Bill Number (EWB Number).
- Verify the entered details.
- Click Reject to reject the E-Way Bill.
Field Details:
- GSTIN: Select the recipient GSTIN against which the E-Way Bill was generated.
- E-Way Bill Number: Enter the E-Way Bill Number (EWB) that needs to be rejected.
5. Import History
The Import History section enables users to track and review previously uploaded or downloaded files within the system.
Steps
- Navigate to the Import History section.
- Select the period range or use the search option to locate specific records.
- View the status and details of previous import or export transactions.
6. Client Master – Create E-Way Bill Company
When GST credentials are entered during E-Way Bill generation, the Company Master may be created automatically. Alternatively, the company can also be created manually through the Client Master.
Steps
- Navigate to the Client Master section.
- Click Add to create a new record.
- Enter the GSTIN of the company and press Enter.
- Provide the required GSP credentials for E-Way Bill integration.
- Verify the entered details and click Save.
- Enter the OTP for verification and click Submit to complete the process.
7. View / Download / Email E-Way Bill
This feature allows users to view, download, or email generated E-Way Bills directly from the system.
Steps
- Navigate to the View Generated E-Way Bill section.
- Search for or select the required E-Way Bill.
- Review the E-Way Bill details displayed on the screen.
- Click Download to download the E-Way Bill document.
- Use the Email option to send the E-Way Bill to the concerned party or the registered email address.
8. Download Edit Log
The Download Edit Log feature maintains a detailed record of changes or updates made to E-Way Bill data within the system.
This log helps users to:
- Track modifications made to E-Way Bill records
- Maintain audit transparency
- Review historical changes and system updates
The E-Way Bill module in Express GST streamlines the complete lifecycle management of E-Way Bills by enabling users to generate, update, cancel, reject, and track E-Way Bills directly within the application. With features such as Part B updates, bulk import functionality, import history tracking, and edit logs, the module ensures improved operational efficiency, transparency, and compliance with GST regulations.
By providing centralized access to all E-Way Bill–related activities, the system helps users manage transportation documentation efficiently, maintain accurate records, and ensure regulatory compliance throughout the process.
Related Articles
E-Invoice & E-Way Bill – Unified Interface
E-Invoice & E-Way Bill Generation – Unified Interface Spectrum Cloud GST introduces a Unified E-Invoice & E-Way Bill Interface by integrating the existing E-Way Bill (EWB) and E-Invoice modules into a single platform. This enhancement enables users ...ExpressGST || GSTR-1 vs E-Way Bill (EWB) Reconciliation Process - DIY
Reconciliation between GSTR-1 and E-Way Bill (EWB) data is a critical aspect of ensuring GST compliance and data accuracy. The following structured guide outlines the complete process within the ExpressGST platform, helping users identify mismatches, ...NIC GSP Login Creation Process
NIC GSP Login Creation Process (Note: This is distinct from the NIC Portal Login credentials) To facilitate E-Way Bill Reconciliation, users are required to create a new GST Suvidha Provider (GSP) account. Follow the steps below to complete the ...ExpressGST || R1 vs EWB Reconciliation Workflow
The R1 vs EWB Reconciliation feature in ExpressGST enables users to seamlessly compare invoices filed in GSTR-1 with the data available in the E-Way Bill (EWB) system. This ensures accuracy, identifies inconsistencies, and facilitates compliant GST ...TDS || Process for Form 16 File download
Form 16 is a crucial document issued in accordance with Section 203 of the Income-Tax Act 1961, provided by employers to salaried professionals in India. This certificate serves as confirmation that Tax Deducted at Source (TDS) has been appropriately ...